How to Make a Roblox Game Pass in 2022 – Step‑by‑Step
Why add a game pass?
Game passes are one of the simplest ways to monetize a Roblox experience without forcing every player to pay. They let you lock premium content—extra weapons, exclusive maps, or even a vanity item—behind a one‑time purchase. Because the revenue shares are handled automatically by Roblox, creators can focus on polishing the gameplay instead of chasing payments.
Getting ready in Roblox Studio
Before you dive into the pass itself, make sure your place is set up for it. A game pass works best when the associated feature is already built into the game, but you’ll need a few placeholders so the pass can be toggled on or off.
- Identify the feature. Decide what players will receive—perhaps a faster sprint speed or a secret door.
- Add a Boolean value. In ReplicatedStorage, create a
BoolValuenamed after the pass, such asHasSpeedBoost. - Script the logic. Write a short script that checks the Boolean before granting the benefit. This keeps the pass optional and easy to test.
Once those pieces are in place, you’ll be able to tie the pass to the in‑game reward without rewriting large sections of code.
Creating the pass on the Roblox website
The actual pass is made through the developer portal, not inside Studio. Follow these steps:
- Log in to Roblox Create and select the game you want to enhance.
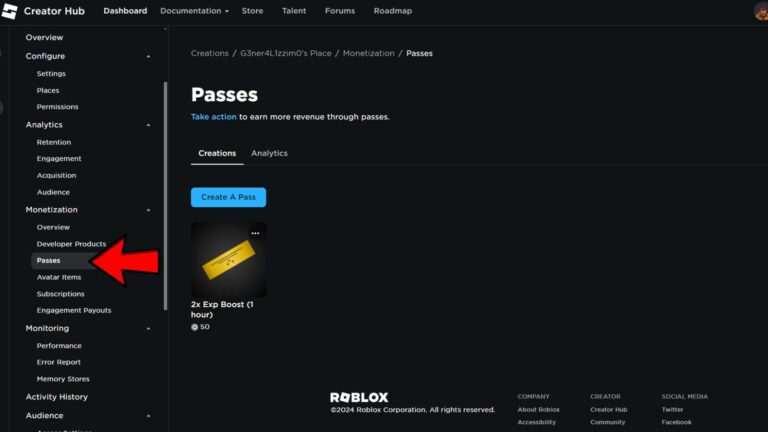
- Navigate to the Monetization tab on the left‑hand menu.
- Click Game Passes, then press the Create New Pass button.
- Upload a square image (512 × 512 px works well) that represents the pass. Keep it clear—players should instantly know what they’re buying.
- Give the pass a concise name, like “Speed Boost Pack,” and write a short description that highlights the benefit.
- Set the price in Robux. For most indie creators, 25–50 Robux is a sweet spot: it feels affordable yet still contributes meaningfully to earnings.
- Hit Buy to finalize. The pass will now appear in your list with a unique ID.
Take note of that ID; you’ll need it in your script to verify ownership.
Linking the pass to your game code
Roblox provides a service called MarketplaceService that can check whether a player owns a specific pass. Insert the following snippet into a server script, preferably in ServerScriptService:
local MarketplaceService = game:GetService("MarketplaceService")local PASS_ID = 12345678 -- replace with your actual pass ID
game.Players.PlayerAdded:Connect(function(player)
local hasPass = false
local success, result = pcall(function()
return MarketplaceService:UserOwnsGamePassAsync(player.UserId, PASS_ID)
end)
if success and result then
hasPass = true
player:FindFirstChild("HasSpeedBoost", true).Value = true
end
end)
Replace 12345678 with the ID you recorded earlier. This script runs whenever a player joins, granting them the Boolean value you created if they own the pass.
Testing the pass before publishing
Testing can be a little tricky because you can’t purchase a pass with a free account. The easiest workaround is to use the Play Solo mode while logged into a premium account that already owns the pass. Alternatively, you can temporarily set the script to grant the Boolean to every player, just to verify that the in‑game feature activates correctly.
Remember to remove any testing shortcuts before you go live; otherwise, anyone could receive the premium perk for free.
Publishing and promoting your new pass
Once you’ve confirmed the pass works, head back to the Monetization page and toggle the pass to “Active.” Roblox automatically makes it visible in the game’s store page. To boost visibility, consider these low‑effort promotion ideas:
- In‑game billboard. Place a sign or GUI button that explains the benefit and includes a “Buy Now” prompt.
- Social media teaser. Post a short clip on Twitter or Discord showing the exclusive content in action.
- Limited‑time discount. Roblox occasionally offers “Developer Discount” events; timing your launch with one can spike early sales.
Maintaining and updating passes
Game passes aren’t set‑and‑forget items. Player feedback might reveal bugs, or you might want to add extra perks to keep the offering fresh. You can edit the description or price at any time, but changing the image requires creating a new pass entirely. Keep a changelog in the description so buyers know what’s new.
Common pitfalls to avoid
Even seasoned creators stumble over a few recurring issues:
- Hard‑coding the pass ID. If you clone the game for another project, you’ll need to update the ID manually. Storing the ID in a
ModuleScriptmakes future edits painless. - Neglecting the “Owned” check. Some scripts only run on
PlayerAdded, which means a player who purchases the pass while already in the game won’t receive the benefit until they rejoin. Adding aMarketplaceService.PromptGamePassPurchaseFinishedlistener can fix that. - Pricing too high. While a premium pass can be lucrative, overpricing discourages new players and can hurt overall game retention.
FAQ
Can I sell a game pass to players who don’t have Roblox Premium?
Yes. Game passes are available to all users, regardless of their Premium subscription. However, Premium members receive a 30 % revenue share boost, which can make the pass more attractive to them.
Do players keep the pass forever, even after I delete it?
If you remove a pass from the Monetization page, existing owners retain it, but the game will no longer recognize the ID. It’s best to disable a pass rather than delete it if you plan to repurpose the feature later.
How often does Roblox pay out earnings from game passes?
Payouts are processed monthly, provided you meet the minimum threshold of 100 USD in earnings. The exact date varies, but you’ll receive a notification in the developer dashboard.
Is there a limit to how many passes I can create for a single game?
Roblox allows up to 100 distinct game passes per place, which is more than enough for most creators. If you need more, consider splitting content across multiple places within the same universe.