How to Set Print Margins for Perfectly Aligned Documents
When you aim for a fit‑for‑printing document, understanding margins is essential. Margins dictate where the ink stops, where the page can be trimmed, and whether readers will feel cramped or comfortable. Even a beautifully designed flyer can look sloppy if its margins are off, so getting them right is the first step toward a polished final product.
Why Margins Matter in Print Projects
Print margins aren’t just an aesthetic choice; they serve practical functions. First, they provide a safe zone that protects crucial text and images from being cut off during trimming. Second, they create visual balance, guiding the eye across the page without forcing the reader to chase content toward the edges. Finally, consistent margins help printers set up the press faster, reducing the risk of costly re‑runs.
Standard Margin Sizes and When to Use Them
There’s no one‑size‑fits‑all rule, but most commercial printers recommend a few baseline numbers:
- Inside (binding) margin: 0.5–0.75 in for most books; up to 1 in for thick volumes.
- Outside margin: 0.25–0.5 in, enough to keep text readable but not waste space.
- Top and bottom margins: 0.5 in is common, though a slightly larger top margin (0.75 in) can accommodate headers or page numbers.
If you’re designing a brochure, a 0.25 in bleed plus a 0.125 in trim safety zone is typical. For posters, designers often allow a broader “margin of error” of about 0.5 in because large‑format printers can be less precise.
Setting Margins in Popular Design Tools
Each program has its own workflow, but the core concepts stay the same.
Microsoft Word
1. Open the Layout tab.
2. Click Margins and choose Custom Margins.
3. Enter the values you’ve decided on, remembering to add an extra 0.125 in if you need a bleed area.
4. Use View → Print Layout to see how the page will look when printed.
Adobe InDesign
InDesign gives you the most control. When you create a new document, set the Bleed (usually 0.125 in) and the Slug (optional notes for the printer). The Margins fields let you type in top, bottom, left, and right values. Turning on the Margins and Columns guide helps you keep text frames inside the safe zone.
Adobe Photoshop
Photoshop isn’t a layout tool, but you can still plan margins:
- Start with a canvas that includes the bleed (e.g., 8.5 × 11 in plus 0.25 in on each side).
- Drag guides from the rulers (View → Rulers) to the margin positions you want.
- Lock the guides so you don’t accidentally move them.
Bleed, Trim, and Safe Zone: The Triple Threat
The terms often appear together, yet they address different parts of the printing process:
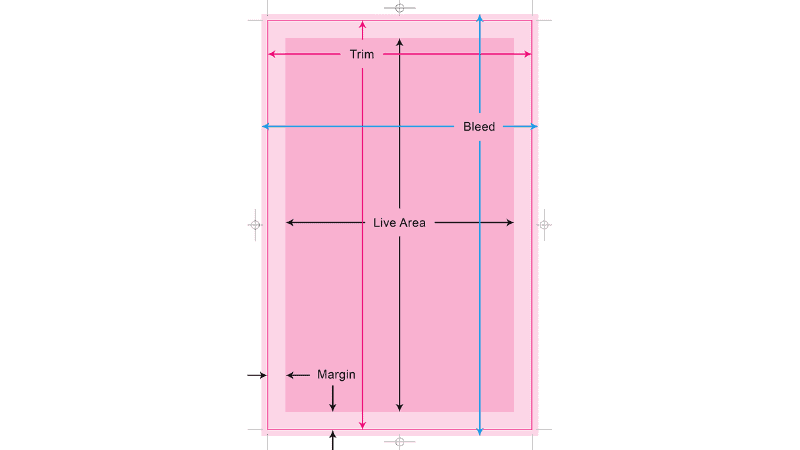
- Bleed is the area that extends beyond the final cut line. It ensures background colors or images reach the edge of the page after trimming.
- Trim line marks where the paper will be cut.
- Safe zone sits inside the trim line, typically 0.125 in, where all essential content should reside.
Think of the page as a three‑ring target: bleed on the outside, trim in the middle, and safe zone at the core. Anything placed in the bleed will disappear into the final edge; anything placed outside the safe zone risks being clipped.
Adapting Margins for Different Paper Sizes
Letter, A4, and legal formats each have unique quirks. For instance, A4 (210 × 297 mm) often uses a 0.4 in inside margin for reports, while U.S. Letter (8.5 × 11 in) may allow a slightly larger top margin for a title block. When scaling a design from one size to another, always recalculate the margins relative to the new dimensions—don’t simply copy‑paste the old numbers.
Common Pitfalls and How to Avoid Them
Even seasoned designers slip up. Here are a few traps and quick fixes:
- Ignoring the printer’s specifications: Always ask the print shop for their preferred bleed and margin guidelines before you start.
- Placing text too close to the edge: Use the safe zone as a hard rule; a quick visual check with “Show Rulers” can catch oversights.
- Mixing units: Stick to either inches or millimeters throughout a project to prevent conversion errors.
- Forgetting the binding offset: In multi‑page documents, the inside margin must accommodate the gutter where the pages meet.
Quick Checklist Before Sending to Print
Run through this list one last time:
- All margins meet the printer’s minimum requirements.
- Bleed area is correctly set and filled with background color or image.
- Important text and graphics stay inside the safe zone.
- File is exported in the correct format (PDF/X‑1a is a common standard).
- Resolution is 300 dpi for raster images.
Frequently Asked Questions
What’s the difference between a margin and a gutter?
A margin is the space between the page edge and the content, while a gutter is the extra space added on the inside edge of a bound document to accommodate the binding.
Do I need a bleed for a black‑and‑white brochure?
Only if the design includes background color or images that reach the edge. Pure text on white paper generally doesn’t require bleed.
Can I set different margins for portrait and landscape pages?
Yes. Most layout programs let you assign separate margin sets per orientation, which is handy for photo books or mixed‑format reports.
How far from the edge should I keep my page numbers?
Page numbers are usually placed within the outer margin, often 0.25 in from the edge, but double‑check the printer’s guidelines to avoid accidental cuts.