How to Switch from a Microsoft to a Local Account in Windows 11
When you first set up a fresh Windows 11 PC, the installer nudges you toward a Microsoft account. It works fine for syncing settings, OneDrive, and the Microsoft Store, but many users eventually discover they’d rather keep things local. Whether it’s privacy concerns, a desire for a simpler login, or just the need to share the machine without handing over personal data, the process of moving from a Microsoft account to a local account is surprisingly straightforward.
Why Switch from a Microsoft Account to a Local Account in Windows 11
Before diving into the steps, it helps to understand the trade‑offs. A Microsoft account links your device to cloud services, enabling automatic theme sync, password recovery, and easy access to Office 365. On the flip side, that same link means your credentials travel over the internet, and Microsoft retains a record of your activity. A local account, by contrast, stores login data only on the device, offering a tighter privacy envelope and a quicker sign‑in experience—especially on shared or family PCs where you don’t want every user to see the same cloud‑based apps.
Another practical reason is offline access. If you’re often without internet, a local account lets you log in without the occasional “cannot connect to Microsoft servers” hiccup. That said, you’ll lose automatic syncing of settings and the ability to download apps directly from the Microsoft Store without signing in again.
Preparing for the Switch
First, make sure you have an alternative sign‑in method ready. Windows 11 allows you to set a PIN, a picture password, or a simple password for local accounts. If you rely on any Microsoft‑specific services—like OneDrive backup or Xbox Live—consider where those files will live after the change. Copy them to an external drive or a non‑Microsoft cloud storage solution if you don’t want to lose access.
It’s also wise to note down any custom settings you might have synced, such as theme colors or desktop layouts. While most of these will survive the transition, a quick screenshot can save you a few minutes of re‑tweaking later.
Step‑by‑Step Guide to Switching
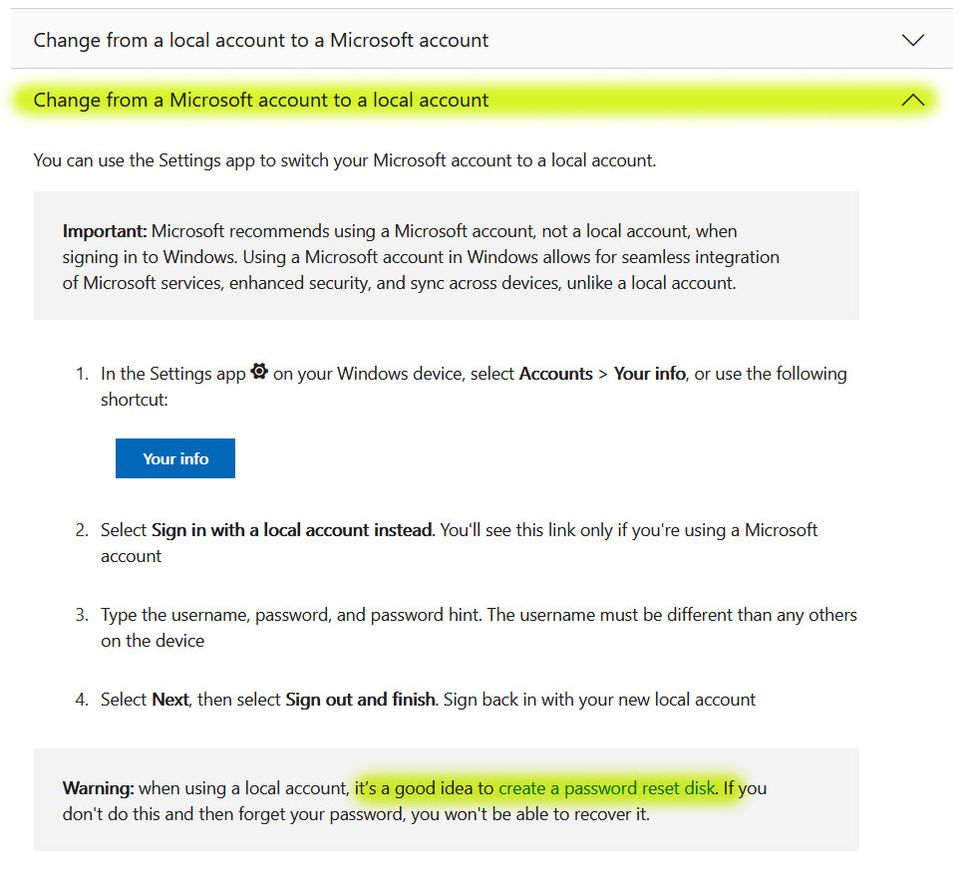
- Open Settings. Click the Start button, then the gear icon, or press Win + I on your keyboard.
- Navigate to Accounts. In the left pane, select “Accounts,” then click “Your info.”
- Find the “Sign in with a local account instead” option. It appears beneath your Microsoft account details. Click it.
- Verify your identity. Windows will prompt you to enter your current Microsoft password to confirm you’re the account owner.
- Choose a local account name and password. Fill in the desired username, a password (or leave it blank for a password‑less account, though this is not recommended), and a password hint.
- Confirm the switch. After reviewing the changes, click “Next” and then “Sign out and finish.” Windows will log you out of the Microsoft account and log you back in with the new local credentials.
That’s it—your device now runs on a local account. If you ever need to revert, the same path in Settings lets you “Sign in with a Microsoft account instead.” Just follow the prompts and re‑enter your Microsoft credentials.
What Happens to Your Data?
Most of your files remain untouched because they live in the user profile folder (C:\Users\YourName). However, apps that relied on the Microsoft account for licensing—such as certain Office subscriptions—may prompt you to re‑authenticate. OneDrive will also stop syncing automatically; you can either reinstall it with a new account or continue using it manually.
For apps that store data in the cloud, like Microsoft Teams or Outlook, you’ll need to sign in again with your Microsoft credentials. The local account won’t erase any data; it merely changes the authentication layer.
Tips for a Smooth Transition
- Backup important files. A quick copy to an external drive eliminates any “oops” moments.
- Keep a recovery option. If you think you might need the Microsoft account later, write down the email address and password somewhere safe.
- Consider a secondary local account. Create a second user profile for guests; this keeps the primary account tidy while still offering local‑only access.
- Check scheduled tasks. Some background services, like Windows Update, may still reference the Microsoft account. A quick glance at Task Scheduler can prevent surprise errors.
Frequently Asked Questions
Can I switch back to a Microsoft account later?
Absolutely. Return to Settings → Accounts → Your info and click “Sign in with a Microsoft account instead.” You’ll be asked for your email and password, then Windows will re‑link the device to the cloud.
Will switching affect my installed apps?
Most desktop applications remain unaffected because they tie to the Windows user profile, not the Microsoft account. However, store apps that require a Microsoft login may need you to re‑enter credentials.
Do I lose access to the Microsoft Store?
The Store itself stays available, but you’ll be prompted to sign in each time you want to download or purchase an app. A local account can still browse the Store, just not sync purchases automatically.
Is a local account less secure than a Microsoft account?
Security depends more on the password you set than the account type. A strong, unique password (or a PIN) on a local account can be just as secure. The main difference is that a Microsoft account offers password recovery and two‑factor authentication, which you’ll miss if you go local.